|

 FITTING RECHARGEABLE BATTERY
TO FLUKE i2000FLEX
 The FLUKE i2000FLEX, a switchable 200/2000A Rogowski current sensor, is a super addition to instruments such as the Fluke 43B. However, there is one annoying characteristic to such peripherals, they use standard batteries! And chomping the battery up in a mere 160 hours of use does not endear one to the thought of their use. The FLUKE i2000FLEX, a switchable 200/2000A Rogowski current sensor, is a super addition to instruments such as the Fluke 43B. However, there is one annoying characteristic to such peripherals, they use standard batteries! And chomping the battery up in a mere 160 hours of use does not endear one to the thought of their use.
With rechargeable batteries now becoming commonplace, there is a huge move to using them in peripherals such as this (also, rechargeables are 'environmentally friendly' as batteries are not thrown away any more).
But, it still means that the device has to be opened to gain access to the battery to charge it or to replace it with a freshly charged one. This hassle will almost invariably chase a user to fit standard batteries again.
Those adept to soldering can make their lives a lot easier by not only fitting the i2000FLEX with a rechargeable battery, but to also make it rechargeable in situ thus avoiding the complication of opening the unit every time the battery runs flat.
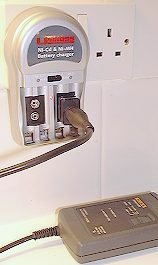
Charging is accomplished with the aid of a standard off-the-shelf charger and a small self-built adapter.
PARTS REQUIRED
2 off 1N4148 or similar diode capable of 100mA forward current
1 off old 9V battery (probably in the i2000FLEX already!)
1 off rechargeable 9V battery
1 off 9V compatible charger
1 off female BNC
Epoxy resin compound
CHARGING ADAPTER
Take the old battery and cut through the case about a third from the bottom using a small hacksaw.
 Remove the battery, and dismantle saving only the contact portion and the larger piece of casing. Remove the battery, and dismantle saving only the contact portion and the larger piece of casing.
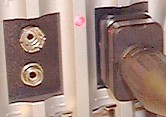
Solder the BNC socket to the contacts with the centre pin to the positive (smaller contact), and the outer to the negative (larger, crown-shaped contact).
Slide the adapter into the saved portion of the case and fill with prepared resin till the bottom of the BNC connector is covered (taking care not to have the resin reach above the lip).
Leave to dry (it is difficult, but do try to leave for 24 hours).
Break the case off the resin and adapter is complete.
CHANGES TO i2000FLEX
Open the i2000FLEX as normal and remove the battery.
Remove the metal chassis from the top cover (screw located next to output cable)
Carefully remove the circuitry from the chassis by unscrewing the four cable grip screws.
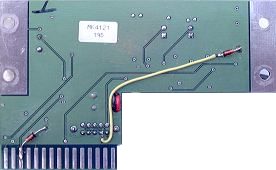
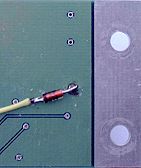
Turn the circuitry over and solder a diode from the output connection to the point indicated on the switch with the anode toward the output and the cathode toward the switch.
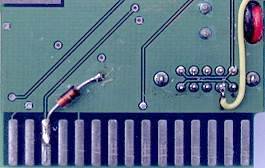
On the component side, solder the second diode in the holes shown taking care the anode is towards L2 and the cathode towards L1.
CHARGING
Charging is done by switching the unit off, coupling the output lead to the adapter, and inserting the adapter in to the 9V charger. Follow the instructions on the charger (the typical is to leave the battery to charge for about 14 hours).
Most modern batteries are quite happy to be "overcharged" i.e. should you be in doubt as to the condition of the battery, it is acceptable to recharge the battery for a whole 14 hours before use even if the battery is already fully charged.
Note: This web page does not form part of any official documentation.
Any information contained herein is used at own risk.
© M.T.P. - 11.11.04
|